Installation of Lemur Certificate Manager on Ubuntu
On this page
- Dependencies
- Installing Build Dependencies
- Setting up the build environment
- Installing Lemur from Source
- Creating Lemur configuration
- Update Lemur configuration
- Setup Postgres Database
- Initializing Lemur Certificate Manager
- NGINX web server configuration for Lemur
- Starting the Web Service
- Conclusion
This tutorial shows the installation of the Lemur certificate management software on Ubuntu 16.04 LTS. Lemur is an open source project of NetFlix and used to generate the certificates for customers/clients. In this article, we will set up a Python-based virtual environment, install the required packages, configure the basic web service and access the dashboard of the certificate manager. It is assumed that you have a clean Ubuntu 16.04 LTS instance running, e.g. in the Cloud (like AWS) or a local virtualized environment.
Dependencies
Some basic prerequisites which you'll need in order to run Lemur:
- Linux operating system (Ubuntu 16.04 LTS is used in this tutorial).
- Python 3.5 or greater.
- PostgreSQL 9.4 or greater.
- Nginx Web server.
Installing Build Dependencies
When you install Lemur on a bare Ubuntu OS, you will need to grab the following packages so that Lemur can correctly build its dependencies:
.. code-block:: bash
sudo apt-get update
sudo apt-get install nodejs nodejs-legacy python-pip python-dev python3-dev libpq-dev build-essential libssl-dev libffi-dev libsasl2-dev libldap2-dev nginx git supervisor npm postgresql

The above command will install nodejs, pip, nginx , git, npm, and PostgreSQL database packages.
Note: Installing the node package manager may create the nodejs bin at /usr/bin/nodejs path instead of /usr/bin/node. Run the following command to create a soft link at the desired path.
sudo ln -s /user/bin/nodejs /usr/bin/node
Now, install virtualenv package using following command.
sudo pip install -U virtualenv

Setting up the build environment
In this guide, Lemur will be installed in the /www directory, so you need to create that directory first:
sudo mkdir /www
cd /www

Now, clone Lemur latest source inside the just created directory and give yourself write permission (lemur user is the created in this tutorial):
sudo useradd lemur
sudo passwd lemur
sudo mkdir /home/lemur
sudo chown lemur:lemur /home/lemur

sudo git clone https://github.com/Netflix/lemur
sudo chown -R lemur lemur/

Also, create the virtual environment, activate it and enter Lemur's directory:
su lemur
virtualenv -p python3 lemur
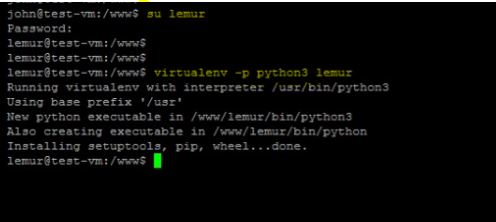
source /www/lemur/bin/activate
cd lemur

Activating the environment adjusts PATH environment variable , so that things like pip now install into the virtualenv by default.
Installing Lemur from Source
After setting up the system, make sure that you are in the virtualenv to run "make release" command.
which python

And run the following command to install npm dependencies as well as compile static assets.
make release

Creating Lemur configuration
Before we run Lemur, we must create a valid configuration file for it. The Lemur command line interface comes with a simple command to get you up and running quickly. The following command will create a default configuration under "~/.lemur/lemur.conf.py" and this location can be specify by passing the config_path parameter to the create_config command.
lemur create_config

Update Lemur configuration
Once created, you will need to update the configuration file with information about your environment, such as which database to talk to, where keys are stored etc.
vi ~/.lemur/lemur.conf.py
The SQLALCHEMY_DATABASE_URI string of Postgresql can be broken up like this:
"postgresql://userame:password@<database-fqdn>:<database-port>/<database-name>"
The below given screenshot shows that following required variables are filled in the configuration file:
LEMUR_SECURITY_TEAM_EMAIL
LEMUR_DEFAULT_COUNTRY
LEMUR_DEFAULT_STATE
LEMUR_DEFAULT_LOCATION
LEMUR_DEFAULT_ORGANIZATION
LEMUR_DEFAULT_ORGANIZATIONAL_UNIT

Setup Postgres Database
For production, a dedicated database is recommended. For this guide, I will assume postgres has been installed and is on the same machine that Lemur is installed on.
First, set a password for the postgres user. For this guide, we will use lemur as an example but you should use the database password generated by Lemur:
sudo -u postgres -i

psql
postgres=# CREATE USER lemur WITH PASSWORD 'lemur';
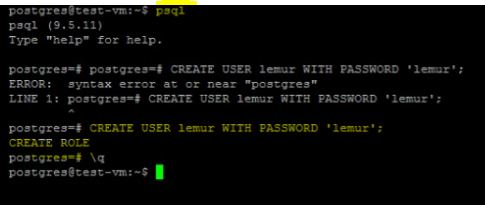
Once successful, type CTRL-D to exit the Postgres shell.
Next, we will create our new database:
sudo -u postgres createdb lemur

Initializing Lemur Certificate Manager
Lemur provides a helpful command that will initialize your database for you. It creates a default user (lemur) that is used by Lemur to help associate certificates that do not currently have an owner. This is most commonly the case when Lemur has discovered certificates from a third party source. This is also a default user that can be used to administer Lemur.
In addition to creating a new user, Lemur also creates a few default email notifications. These notifications are based on a few configuration options such as LEMUR_SECURITY_TEAM_EMAIL. They basically guarantee that every certificate within Lemur will send one expiration notification to the security team.
Make note of the password used as this will be used during first login to the Lemur UI.
cd /www/lemur/lemur
lemur init

The following snapshot shows the output of the "lemur init" command.

NGINX web server configuration for Lemur
By default, Lemur runs on port 8000. Even if you change this, under normal conditions you won't be able to bind to port 80. To get around this (and to avoid running Lemur as a privileged user, which you shouldn't), we need setup a simple web proxy. There are many different web servers you can use for this, we like and recommend Nginx.
Add following lines in the configuration file "/etc/nginx/sites-available/default".
location /api {
 proxy_pass http://127.0.0.1:8000;
 proxy_next_upstream error timeout invalid_header http_500 http_502 http_503 http_504;
 proxy_redirect off;
 proxy_buffering off;
 proxy_set_header Host $host;
 proxy_set_header X-Real-IP $remote_addr;
 proxy_set_header X-Forwarded-For $proxy_add_x_forwarded_for;
 }
location / {
 root /www/lemur/lemur/static/dist;
 include mime.types;
 index index.html;
 }

After making these changes, restart Nginx service to apply them:
sudo service nginx restart

Starting the Web Service
Lemur provides a built-in web server (powered by gunicorn and eventlet) to get you off the ground quickly. To start the web server, you simply use "lemur start".

You can login with the default user created during Initializing Lemur or any other user you may have created.You should now be able to test the web service by visiting http://192.168.10.51:8000/. (192.168.10.51 is the ip address of the Lemur machine).

The Dashboard of the Lemur is shown above. It is used to create certificates using self signed or root Certificate Authorities.
Conclusion
In this tutorial, the Lemur certificate manager is installed on the latest Ubuntu LTS version. The purpose of Lemur is to create and manage certificates. It also supports different roles of users.

