How to Install Docker Swarm on Ubuntu 22.04
This tutorial exists for these OS versions
- Ubuntu 22.04 (Jammy Jellyfish)
- Ubuntu 16.04 (Xenial Xerus)
On this page
Docker Swarm is a container orchestration built on top of Docker Engine. It allows you to create and deploy a cluster of Docker nodes on multiple servers. Docker Swarm simplifies your containerized application deployment into a service. It provides a simple and easiest way to manage and orchestrate containers.
Docker Swarm offers a high level of available applications. In Docker Swarm, you can run a single application or service on multiple nodes, which are called 'Worker Nodes". And there is also a node called "Swarm Manager", which is the central management and orchestration of the Docker Swarm.
In this tutorial, we'll show you how to install the Docker Swarm software on Ubuntu 22.04 servers step-by-step.
Prerequisites
To complete this guide, ensure you're equipped with the following:
- 3 Ubuntu servers 22.04 - One will be used as Swarm Master/Manager, and two servers will be used as Worker Nodes.
- A non-root user with sudo administrator privileges.
Setting Up Systems
Before installing Docker and Configuring Docker Swarm, you must prepare your systems by completing the following tasks:
- Open Ports for Docker Swarm: You must open some ports that are used by Docker Swarm on all of your servers. This can be achieved via UFW (Uncomplicated Firewall).
- Adding Docker Repository: You will be using the official Docker repository for installing Docker Engine to all of your servers.
Open Ports for Docker Swarm
In the following section, you will open port 22 for SSH, then ports 2377, 7946, and 4789 for Docker Swarm via UFW (Uncomplicated Firewall) on the Swarm Master/Manager and Swarm Nodes. The UFW is installed by default, but not yet started.
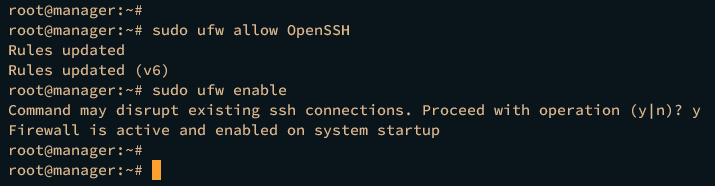
First, run the ufw command below to add the OpenSSH application profile and open the default SSH port 22. Then, start and enable UFW.
sudo ufw allow OpenSSH
sudo ufw enable
Type y to proceed, and you should get the output Firewall is active and enabled on system startup.
Now run the below command to open ports that will be used by services on your Swarm deployment. In this case, you will allocate ports between 30000:35000 for services.
sudo ufw allow 30000:35000/tcp
Next, execute the following command to open ports for Docker Swarm.
for ports in 2377/tcp 7946/tcp 7946/udp 4789/udp
do
sudo ufw allow $ports
done
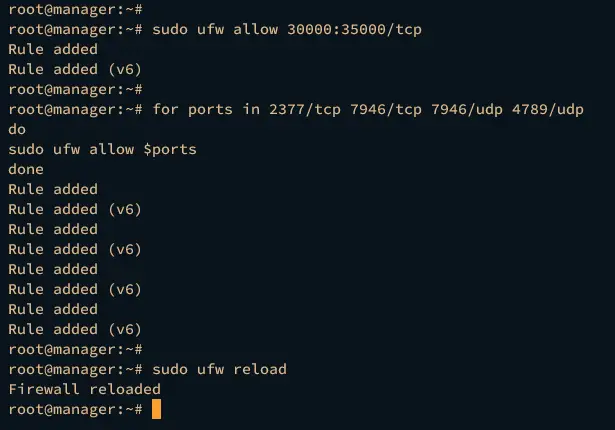
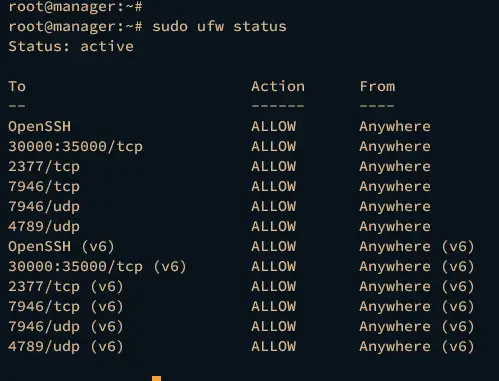
Lastly, reload UFW and verify the UFW status by executing the command below.
sudo ufw reload
sudo ufw status
You should see the OpenSSH application profile, and ports for Docker Swarm including 2377, 7946, and 4789 enabled on UFW.
Adding Docker Repository
After configuring the UFW, you must add the official Docker repository to your servers. You will be using the official Docker repository for installing Docker Engine.
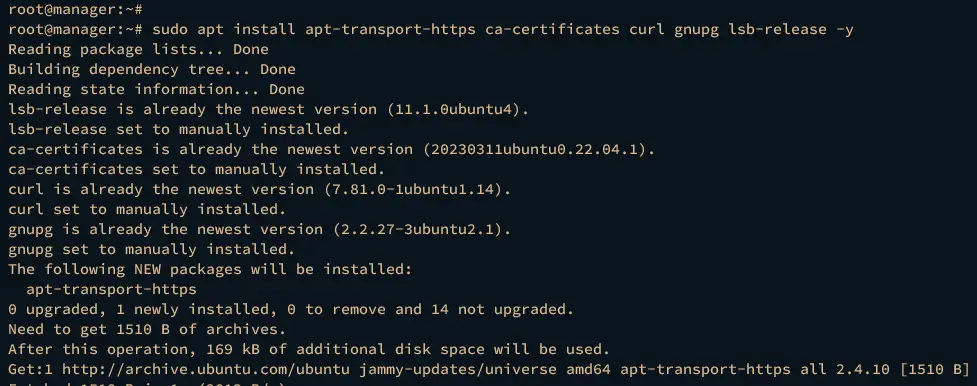
Execute the command below to install some basic packages to your Ubuntu servers.
sudo apt install apt-transport-https ca-certificates curl gnupg lsb-release -y
Next, run the command below to add the Docker GPG key and repository to your systems.
sudo install -m 0755 -d /etc/apt/keyrings
curl -fsSL https://download.docker.com/linux/ubuntu/gpg | sudo gpg --dearmor -o /etc/apt/keyrings/docker.gpg
sudo chmod a+r /etc/apt/keyrings/docker.gpg
echo \
  "deb [arch="$(dpkg --print-architecture)" signed-by=/etc/apt/keyrings/docker.gpg] https://download.docker.com/linux/ubuntu \
  "$(. /etc/os-release && echo "$VERSION_CODENAME")" stable" | \
  sudo tee /etc/apt/sources.list.d/docker.list > /dev/null

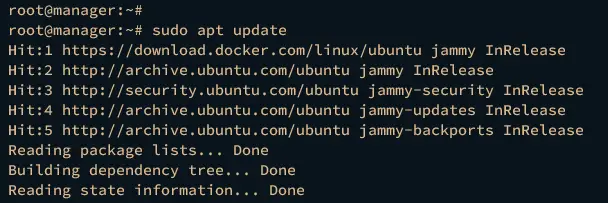
Lastly, update and refresh your Ubuntu repository on each server by executing the command below.
sudo apt update
You should see the Docker repository being fetched during the process.
Installing Docker Engine
After preparing your Ubuntu systems, you will install Docker Engine into those servers.
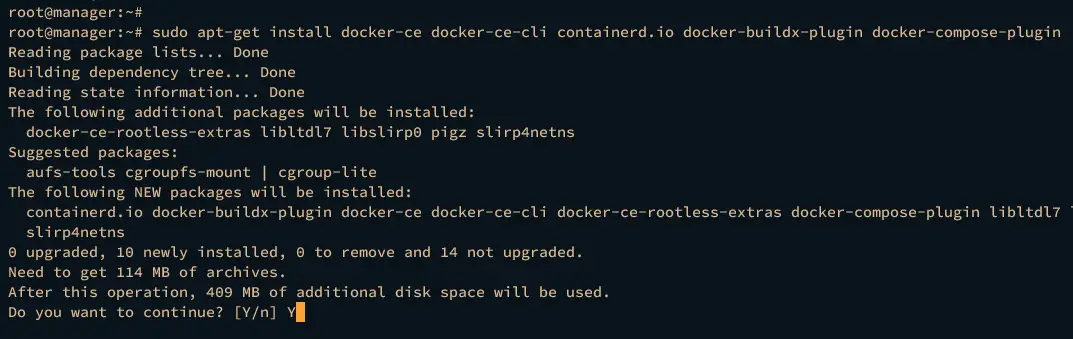
Install Docker Engine to your Ubuntu systems using the command below. Input y to confirm with the installation.
sudo apt-get install docker-ce docker-ce-cli containerd.io docker-buildx-plugin docker-compose-plugin
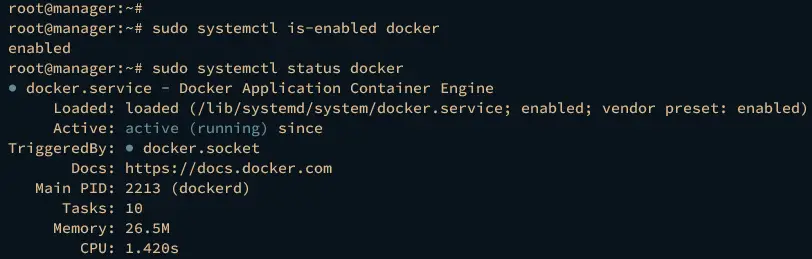
Once the installation is completed, run the systemctl command below to verify the docker service and ensure that the service is running.
sudo systemctl is-enabled docker
sudo systemctl status docker
In the following output, you should see the docker service is running and enabled.
(Optional): Allow Non-Root to Run Docker Containers
If you're deploying Docker Swarm and running containers using a non-root user, you must add your user to the docker group so the user can execute the docker command and run containers.
Run the usermod command below to add your current user to the docker group.
sudo usermod -aG docker username
Now log in as a non-root user and execute the docker command below to verify your configuration.
su - username
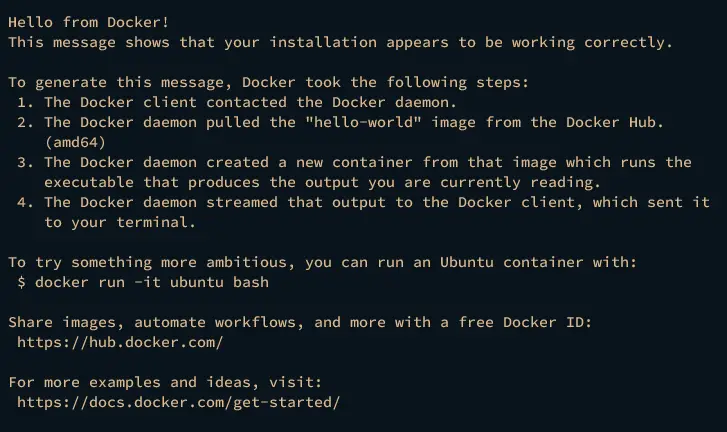
docker run hello-world
If the configuration is successful, you should be able to run the container hello-world and get the following output:
Creating Docker Swarm
Now that you've installed Docker Engine, you're ready to create and start Docker using your Ubuntu servers. In this example, we'll be using one server as Swarm Master/Manager and two servers as Worker Nodes.
Complete the following tasks to set up Docker Swarm:
- Initializing Swarm mode on the Master/Manager.
- Adding Worker Nodes to the Docker Swarm.
Let's begin.
Initializing Swarm Mode on Master/Manager
To initialize Docker Swarm, run the docker swarm init command below. The additional parameter --advertise-addr will bind the Docker Swarm within the specific IP address, and the parameter --default-addr-pool determines the internal IP address for containers that running on the Swarm.
In this example, the Docker Swarm mode will bind to IP address 192.168.5.30 and the IP address pool for containers is 10.20.0.0/16.
docker swarm init --advertise-addr 192.168.5.30 --default-addr-pool 10.20.0.0/16
If the initialization process is successful, the following output will be displayed. Within the output, you should see the generated token for adding Nodes to Docker Swarm.

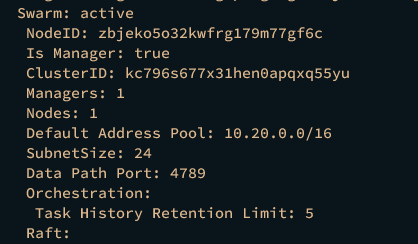
Next, run the following command to check the Swarm mode status.
docker info
If the Swarm mode is enabled, you should get the output Swarm: active with details of NodeID, and the status of Manager and Node.
Lastly, execute the command below to verify the list of Nodes on the Docker Swarm.
docker node ls
At this point, only one Node is available on your Docker Swarm, which is the Swarm Master/Manager.

Adding Worker Nodes to Docker Swarm
With the Docker Swarm initialized you can add worker nodes to your Docker Swarm.
First, run the command below to show the generated token for the worker node.
docker swarm join-token worker
You should see instructions for adding worker nodes, which include the token.

Now, move to the worker node and add the worker node to the Docker Swarm by executing the docker swarm join command below.
docker swarm join --token SWMTKN-1-0i6kbe2oek1iw19jfpvd2j5l0dhfmssz4w505aeihx7ouz8wqc-2dbk7cnmo12uunj53eywwnqr7 192.168.5.30:2377
When the process is successful, the output 'This node joined a swarm as a worker' will be printed on your screen.
![]()

Next, move back to the Swarm Master/Manager and run the command below to verify the list of available nodes.
docker node ls
If everything goes well, there will be three servers available on the Docker Swarm, 1 the Swarm Manager and 2 worker nodes with the status Ready and availability is running.

Running Service in Docker Swarm
At this point, you've successfully created Docker Swarm with three Ubuntu servers. Now, you will learn how to deploy your application into the Docker Swarm, which is called a service. A service is an image of your microservice application, and it could be an HTTP server, database server, or other applications.
In this example, you will deploy a simple HTTP service with a Nginx image.
Execute the command below to create a new service on your Swarm. In this example, you will create a new service test-nginx with 1 replica, expose port 30001, and base the nginx:alpine image.
docker service create --replicas 1 --name test-nginx -p 30001:80 nginx:alpine

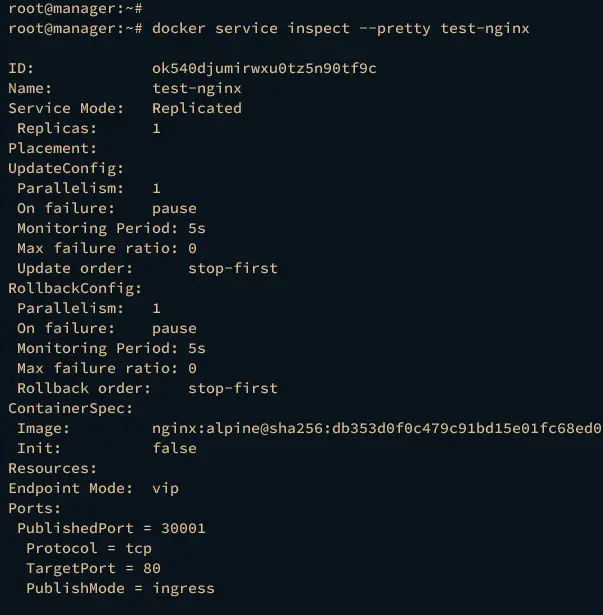
Now, check the details of the test-nginx service using the below command.
docker service inspect test-nginx
docker service inspect --pretty test-nginx
You should see detailed information on test-nginx service like the following.
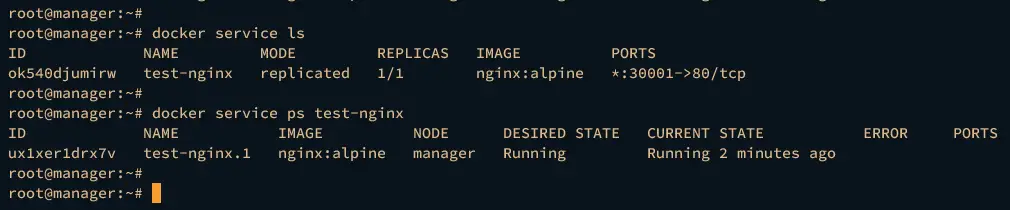
Next, verify the list of Docker services within the Docker Swarm using the command below.
docker service ls
docker service ps test-nginx
If successful, you should see the test-nginx service running on the NODE manager with 1 replica and exposed port 30001.
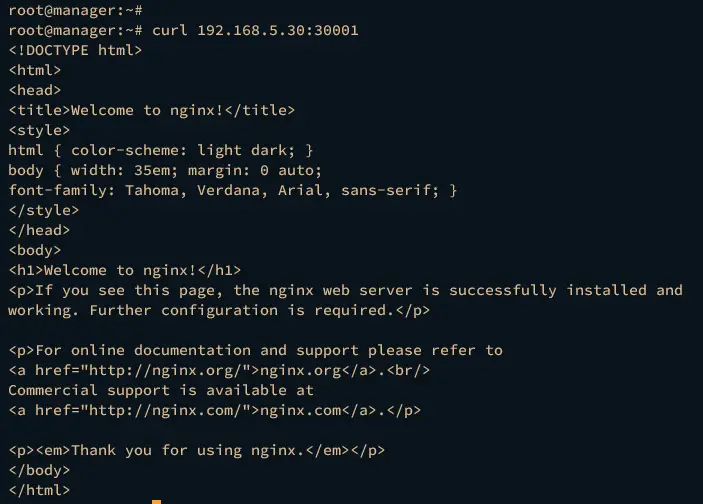
Lastly, access the test-nginx service via the host IP address with port 30001 using the curl command below.
curl 192.168.5.30:30001
curl -I 192.168.5.30:30001
You should see the index.html source code page and the details of HTTP headers.
Scaling Service in Docker Swarm
Now that you've deployed the Docker service, the next task is to scale the service on Docker Swarm. This will create the desired replication of your services across worker nodes.
To scale a service, run the docker service scale command below. In this case, you will scale the test-nginx service to 3 replicas.
docker service scale test-nginx=3
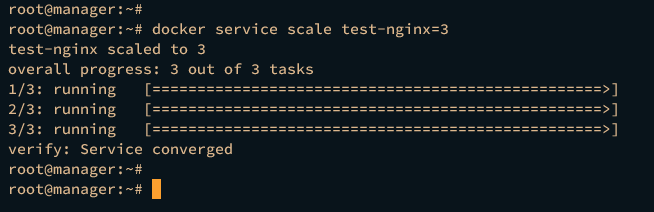
Now run the below command to verify the test-nginx service. If the test-nginx service scaled, you should see another two services created by Docker and running on both worker nodes.
docker service ps test-nginx

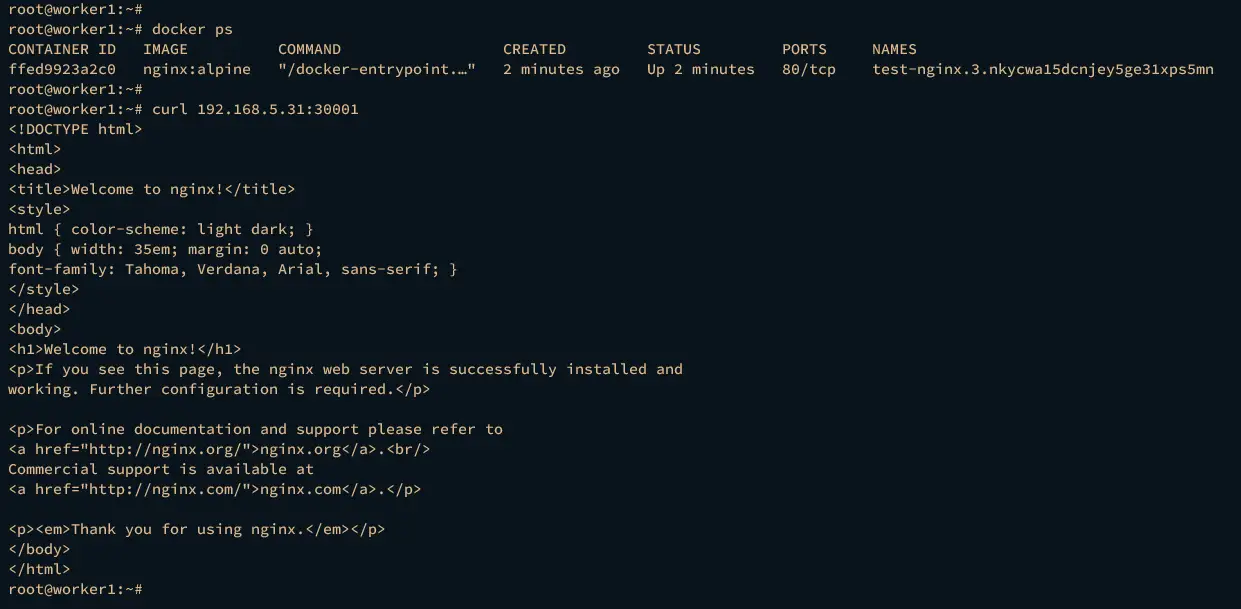
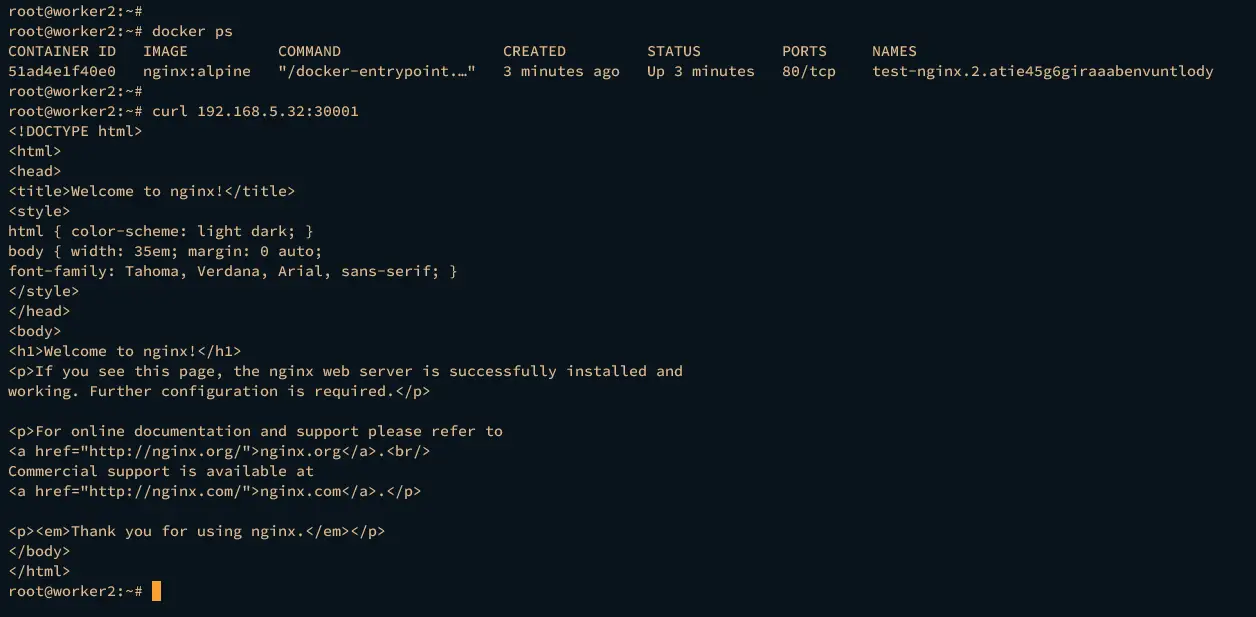
Move to the worker node terminal and run the following command to ensure that the test-nginx service is running.
docker ps
curl 192.168.5.31:30001
If everything goes well, you should see the container test-nginx.RANDOM-STRING with status Up on each of the worker nodes.
Deleting Service in Docker Swarm
To clean up your environment, you will delete the test-nginx service from Docker Swarm and remove the nginx:alpine docker image.
Delete the test-nginx service and verify the list of available services on Docker Swarm using the following command.
docker service rm test-nginx
docker service ps
Now remove the nginx:alpine image and check the list of downloaded images for each server using the below command.
docker rmi nginx:alpine
docker images
Conclusion
To wrap up, you've now successfully installed Docker Swarm on Ubuntu 22.04 step-by-step. You've deployed Docker Swarm with three Ubuntu servers and learned how to deploy, scale, and remove applications or services on Docker Swarm.

