Docker Guide: Deploying Ghost Blog with MySQL and Traefik with Docker
Ghost is a powerful open source publishing and blog platform based on nodejs. It's well designed and easy to use. The ghost platform is written in JavaScript and uses node.js as a runtime environment. The first Ghost version released in 2013 under the MIT license..
Traefik is modern HTTP reverse proxy and load balancer for microservices. Traefik makes all microservices deployment easy, integrated with existing infrastructure components such as Docker, Swarm Mode, Kubernetes, Amazon ECS, Rancher, Etcd, Consul etc.
In this tutorial, we will show step-by-step how to install and configure Ghost as a Docker container. We will install and configure Ghost under the latest Docker CE version, use the MySQL as a database and use the Traefik as a Reverse Proxy.
Prerequisites
- Ubuntu 18.04 LTS
- Root privileges
What we will do
- Install Docker CE on Ubuntu 18.04 LTS
- Setup Docker for Non-root User
- Install Docker Compose
- Configure Ghost Stack
- Create a Custom Network
- Create a Project Directory
- Create and Configure MySQL Container
- Create and Configure Traefik Reverse Proxy
- Create and Configure Ghost Container
- Deploy Ghost with MySQL and Traefik
- Testing
Step 1 - Install Docker CE on Ubuntu 18.04 LTS
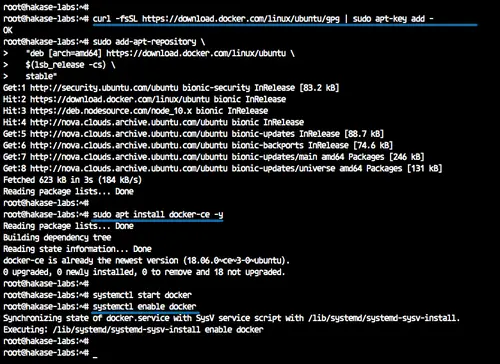
The first step we will do in this tutorial is to install the latest docker-ce version of the system. The docker-ce version can be installed from the official docker repository.
Add the docker key and docker-ce repository.
curl -fsSL https://download.docker.com/linux/ubuntu/gpg | sudo apt-key add -
sudo add-apt-repository \
   "deb [arch=amd64] https://download.docker.com/linux/ubuntu \
   $(lsb_release -cs) \
   stable"
The command will automatically update all repositories on the system.
Now install docker using the apt command below.
sudo apt install docker-ce -y
After the installation is complete, start the docker service and enable it to launch every time at system startup.
systemctl start docker
systemctl enable docker
The latest docker-ce version has been installed on the Ubuntu 18.04 system.
Step 2 - Setup Docker for Non-root User
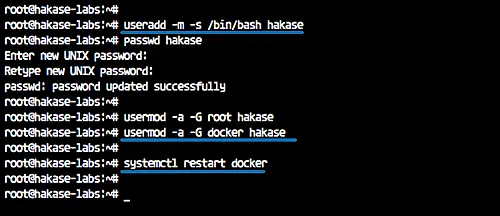
In this guide, all container microservices will be run under the normal/non-root user. So we need to configure the user to be able to run the Docker container and run the sudo command for root privileges.
Create a new user named 'hakase' and create the password.
useradd -m -s /bin/bash hakase
passwd hakase
Now assign the 'hakase' user to the 'sudo' and 'docker' groups.
usermod -a -G root hakase
usermod -a -G docker hakase
And restart the docker service.
systemctl restart docker
The 'hakase' can now run the docker container and run the sudo command for root privileges.
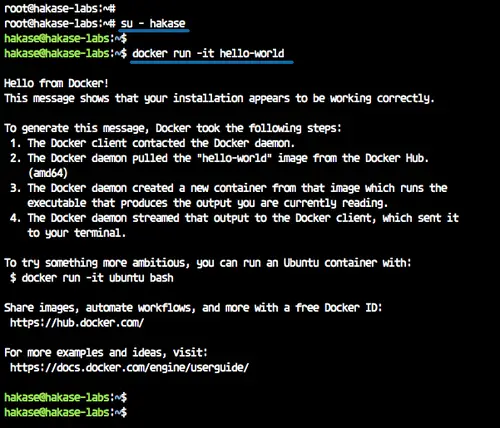
Login as user 'hakase' and run the docker hello-world container.
su - hakase
docker run -it hello-world
And following is the result.
Step 3 - Install Docker Compose
In this tutorial, we will install the docker compose 1.21 from a binary file on Github repository.
Download the docker-compose binary to the '/usr/local/bin' directory.
sudo curl -L https://github.com/docker/compose/releases/download/1.21.2/docker-compose-$(uname -s)-$(uname -m) -o /usr/local/bin/docker-compose
And make the 'docker-compose' file executable by changing the file permission.
sudo chmod +x /usr/local/bin/docker-compose
The docker compose has been installed - check it using the command below.
docker-compose version
docker version
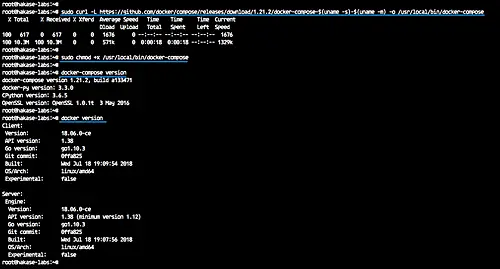
Docker-compose 1.21 with Docker-ce 1.18 has been installed.
Step 4 - Configure Ghost Stack
In this step, we will configure the docker and create a new docker-compose file for the ghost installation.
We will create a new docker custom network and create a new docker-compose yml file that contains three main services, including MySQL database, Traefik reverse proxy, and Ghost blog itself.
Create a Custom Network
Show the available docker network using docker network command below.
docker network ls
Create a new custom docker network for the traefik reverse proxy named 'traefiknet'.
docker network create traefiknet
Now check again the available network on the docker system.
docker network ls
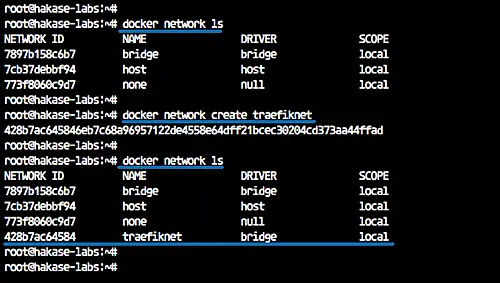
The custom network for Treafik named 'traefiknet' has been created.
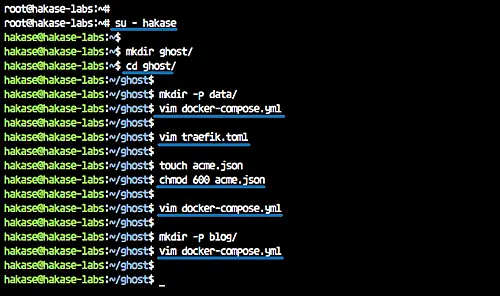
Create a Project Directory
After creating the docker custom network, we will create a new project directory named 'ghost' and create a new docker-compose.yml file.
Login to the 'hakase' user.
su - hakase
Create a new 'ghost' directory and change the working directory to it.
mkdir ghost/
cd ghost/
And create a new docker-compose file.
touch docker-compose.yml
Create and Configure MySQL Service
MySQL is the first service we want to create, and we want to create the MySQL container with configurations below.
- We will be using the MySQL 5.7 docker image.
- Mount the MySQL data directory to the local docker host directory.
- Running the MySQL service on the local internal network.
- Configure MySQL user and password.
- MySQL root password: mypassword
- Database for the ghost named 'ghostdb' with user 'ghost' and password is 'ghostdbpass'
- The MySQL container will be named as 'mysql'.
Inside the 'ghost' directory, create a new directory named 'data' and edit the 'docker-compose.yml' file.
mkdir -p data/
vim docker-compose.yml
Paste the configuration below.
version: '3.3'

services:

  mysql:
    image: mysql:5.7
    restart: always
    volumes:
      - ./data:/var/lib/mysql
    labels:
      - "traefik.enable=false"
    networks:
      - internal
    environment:
      MYSQL_ROOT_PASSWORD: mypassword
      MYSQL_USER: ghost
      MYSQL_PASSWORD: ghostdbpass
      MYSQL_DATABASE: ghostdb
    container_name: mysql
Save and exit.
Create and Configure Traefik Reverse Proxy
After creating the MySQL service, we will create and configure the traefik reverse proxy container.
Before editing the 'docker-compose.yml' script, we need to create a new traefik configuration named 'traefik.toml'.
vim traefik.toml
Paste traefik rule configuration below.
#Traefik Global Configuration
debug = false
checkNewVersion = true
logLevel = "ERROR"

#Define the EntryPoint for HTTP and HTTPS
defaultEntryPoints = ["https","http"]

#Define the HTTP port 80 and
#HTTPS port 443 EntryPoint
#Enable automatically redirect HTTP to HTTPS
[entryPoints]
[entryPoints.http]
address = ":80"
[entryPoints.http.redirect]
entryPoint = "https"
[entryPoints.https]
address = ":443"
[entryPoints.https.tls]

#Enable Traefik Dashboard on port 8080
#with basic authentication method
#hakase and password
[entryPoints.dash]
address=":8080"
[entryPoints.dash.auth]
[entryPoints.dash.auth.basic]
    users = [
        "hakase:$apr1$hEgpZUN2$OYG3KwpzI3T1FqIg9LIbi.",
    ]

[api]
entrypoint="dash"
dashboard = true

#Enable retry sending a request if the network error
[retry]

#Define Docker Backend Configuration
[docker]
endpoint = "unix:///var/run/docker.sock"
domain = "hakase-labs.io"
watch = true
exposedbydefault = false

#Letsencrypt Registration
#Define the Letsencrypt ACME HTTP challenge
[acme]
email = "[email protected]"
storage = "acme.json"
entryPoint = "https"
OnHostRule = true
  [acme.httpChallenge]
  entryPoint = "http"
Save and exit.
Now we need to create a new file for the SSL Letsencrypt configuration 'acme.json'. It's used to store all letsencrypt generate a log.
Create the blank 'acme.json' file and change the permission to 600.
touch acme.json
chmod 600 acme.json
Next, we will edit the 'docker-compose.yml' script and add the traefik service configuration.
- We will be using the latest traefik docker image.
- The container will be named as 'traefik'
- It's used the custom network 'traefiknet', and expose the HTTP and HTTPS ports.
- Mount the docker sock file and the traefik configuration 'traefik.toml' and 'acme.json'
- We defined the traefik dashboard URL and backend through the docker labels.
Edit the 'docker-compose.yml'.
vim docker-compose.yml
Paste the traefik service configuration below.
  traefik:
    image: traefik:latest
    command: --docker
    ports:
      - 80:80
      - 443:443
    labels:
      - "traefik.enable=true"
      - "traefik.backend=dashboard"
      - "traefik.frontend.rule=Host:traef.hakase-labs.io"
      - "traefik.port=8080"
    networks:
      - traefiknet
    volumes:
      - /var/run/docker.sock:/var/run/docker.sock
      - ./traefik.toml:/traefik.toml
      - ./acme.json:/acme.json
    container_name: traefik
    restart: always
Save and exit.
Create and Configure Ghost Service
After configuring the traefik reverse proxy, we will create the main ghost service configuration.
Configuration details that we want to create.
- We will be using the ghost v1 and the small docker alpine version.
- We will mount the ghost content directory to the local directory named 'blog'.
- The ghost service will be running on the default port with the domain name 'gho.hakase-labs.io', the configuration through docker labels.
- The ghost service will be using two docker networks, internal and traefiknet.
- We're configuring the MySQL database details from the mysql container configuration.
- And the ghost will be started when the traefik and MySQL container is up and running.
Create a new directory named 'blog' and edit the 'docker-compose.yml' file.
mkdir -p blog/
vim docker-compose.yml
Paste the configuration below.
  ghost:
    image: ghost:1-alpine
    restart: always
    ports:
      - 2368
    volumes:
      - ./blog:/var/lib/ghost/content
    labels:
      - "traefik.enabled=true"
      - "traefik.backend=ghost"
      - "traefik.frontend.rule=Host:gho.hakase-labs.io"
      - "traefik.docker.network=traefiknet"
      - "traefik.port=2368"
    networks:
      - internal
      - traefiknet
    environment:
      database__client: mysql
      database__connection__host: mysql
      database__connection__user: ghost
      database__connection__password: ghostdbpass
      database__connection__database: ghostdb
    container_name: ghost
    depends_on:
      - mysql
      - traefik

networks:
  traefiknet:
    external: true
  internal:
    external: false
Save and exit.
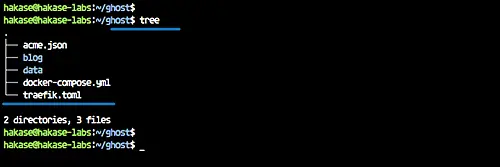
And now we got all directory and configuration as shown below.
tree
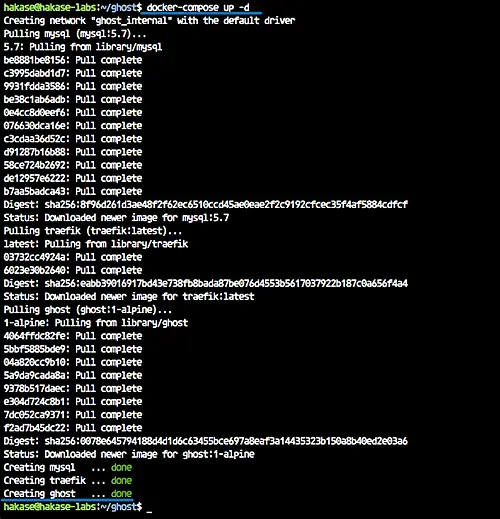
Step 5 - Deploy Ghost with MySQL and Traefik
To build and run all our ghost stack service, we can use the command below.
docker-compose up -d
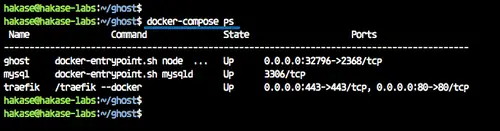
When it's complete, check all running services.
docker-compose ps
And the following is the result.
If you have an error, check the container log using commands below.
docker-compose logs mysql
docker-compose logs traefik
docker-compose logs ghost
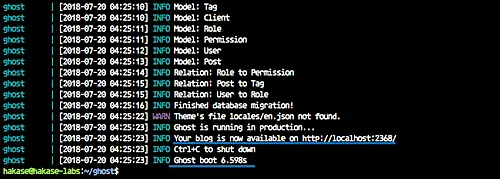
The ghost stack with MySQL and the Traefik reverse proxy is up and running.
Step 6 - Testing
Open the Traefik dashboard with its URL, mine is http://traef.hakase-labs.io/
Log in with the user and password on the 'traefik.toml' file.
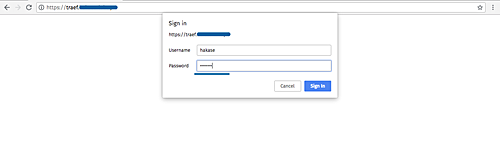
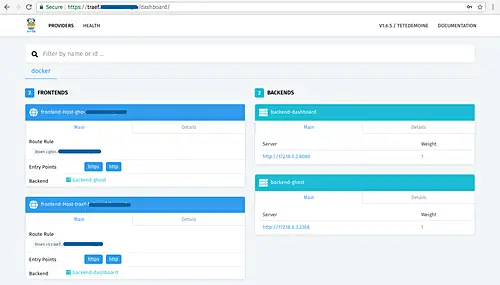
And following is the Traefik dashboard.
For the Ghost installation, type the ghost URL on the address bar, mine is http://gho.hakase-labs.io/
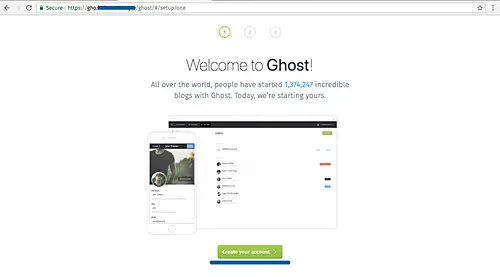
And you will get the ghost home page.

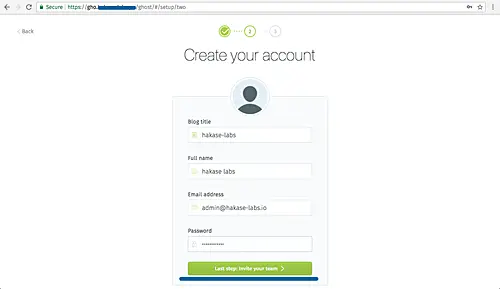
Now visit the admin page to set up and configure a new admin user. My URL is: http://gho.hakase-labs.io/admin/
Click the green button to create a new admin user.
Type detail user, password, email, and click again the green button.
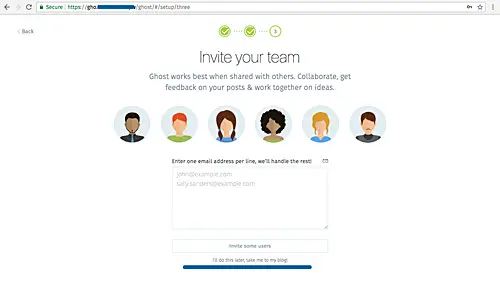
For inviting a new member or user, click the 'I will do this later..' link.
Now you will get the Ghost Dashboard.
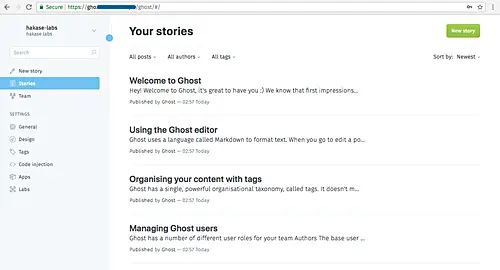
And after creating the sample post, the following is the result.

Ghost blog installation with MySQL database and Traefik Reverse Proxy on the Docker environment has been completed successfully.

