Install Plex Media Server on Ubuntu 20.04
This tutorial exists for these OS versions
- Ubuntu 20.04 (Focal Fossa)
- Ubuntu 18.04 (Bionic Beaver)
- Ubuntu 16.04 (Xenial Xerus)
On this page
Plex is a powerful and feature-rich media streaming server that can be used to organize your video, music, and photo, and stream them to remote the remote devices from anywhere. It supports many operating systems including, Linux, Windows, FreeBSD, macOS, and many more. You can access the media stored on the Plex server from smart TV, smartphone and streaming box using the Plex media client.
Plex has a lot of features some of them are listed below:
- Live TV and DVR.
- Mobile Sync.
- Cloud Sync.
- Premium Music Features.
- Premium Photo Libraries.
- Hardware-Accelerated Streaming.
- Parental Controls.
- Camera Upload.
- Bandwidth and Transcoding Limits.
In this tutorial, we will explain how to install Plex media server with Nginx as a reverse proxy on Ubuntu 20.04 server.
Prerequisites
- A server running Ubuntu 20.04.
- A root password is configured.
Getting Started
First, you will need to update your system packages to the latest version. You can update them with the following command:
apt-get update -y
Once your packages are updated, you can proceed to the next step.
Install Plex Media Server
First, you will need to download the latest version of the Plex media server from the Plex official website. You can download it with the following command:
wget https://downloads.plex.tv/plex-media-server-new/1.20.1.3252-a78fef9a9/debian/plexmediaserver_1.20.1.3252-a78fef9a9_amd64.deb
Once the Plex media server package is downloaded, you can install it using the following command:
dpkg -i plexmediaserver_1.20.1.3252-a78fef9a9_amd64.deb
Once Plex media server is installed, start the Plex service and enable it to start at system reboot with the following command:
systemctl start plexmediaserver
systemctl enable plexmediaserver
Next, you can verify the status of the Plex service with the following command:
systemctl status plexmediaserver
You should see the following output:
? plexmediaserver.service - Plex Media Server
     Loaded: loaded (/lib/systemd/system/plexmediaserver.service; enabled; vendor preset: enabled)
     Active: active (running) since Sat 2020-09-05 06:48:06 UTC; 17s ago
    Process: 38369 ExecStartPre=/bin/sh -c /usr/bin/test -d "${PLEX_MEDIA_SERVER_APPLICATION_SUPPORT_DIR}" || /bin/mkdir -p "${PLEX_MEDIA_SERV>
   Main PID: 38371 (Plex Media Serv)
      Tasks: 120 (limit: 2353)
     Memory: 215.0M
     CGroup: /system.slice/plexmediaserver.service
             ??38371 /usr/lib/plexmediaserver/Plex Media Server
             ??38405 Plex Plug-in [com.plexapp.system] /usr/lib/plexmediaserver/Resources/Plug-ins-a78fef9a9/Framework.bundle/Contents/Resourc>
             ??38451 /usr/lib/plexmediaserver/Plex Tuner Service /usr/lib/plexmediaserver/Resources/Tuner/Private /usr/lib/plexmediaserver/Res>
             ??38474 Plex Plug-in [com.plexapp.agents.plexthememusic] /usr/lib/plexmediaserver/Resources/Plug-ins-a78fef9a9/Framework.bundle/C>
             ??38477 Plex Plug-in [com.plexapp.agents.themoviedb] /usr/lib/plexmediaserver/Resources/Plug-ins-a78fef9a9/Framework.bundle/Conte>
             ??38533 Plex Plug-in [org.musicbrainz.agents.music] /usr/lib/plexmediaserver/Resources/Plug-ins-a78fef9a9/Framework.bundle/Conten>
             ??38544 Plex Plug-in [com.plexapp.agents.thetvdb] /usr/lib/plexmediaserver/Resources/Plug-ins-a78fef9a9/Framework.bundle/Contents>
             ??38638 Plex Plug-in [com.plexapp.agents.opensubtitles] /usr/lib/plexmediaserver/Resources/Plug-ins-a78fef9a9/Framework.bundle/Co>
             ??38710 Plex Plug-in [com.plexapp.agents.fanarttv] /usr/lib/plexmediaserver/Resources/Plug-ins-a78fef9a9/Framework.bundle/Content>

Sep 05 06:48:06 ubuntu2004 systemd[1]: Starting Plex Media Server...
Sep 05 06:48:06 ubuntu2004 systemd[1]: Started Plex Media Server.
At this point, Plex media server is started and listening on port 32400. You can verify it with the following command:
ss -lnpt | grep Plex
You should see the following output:
LISTEN    0         128              127.0.0.1:39851            0.0.0.0:*        users:(("Plex Script Hos",pid=38739,fd=4))
LISTEN    0         128              127.0.0.1:46031            0.0.0.0:*        users:(("Plex Script Hos",pid=38779,fd=4))
LISTEN    0         1024             127.0.0.1:32401            0.0.0.0:*        users:(("Plex Media Serv",pid=38371,fd=61))
LISTEN    0         128              127.0.0.1:44661            0.0.0.0:*        users:(("Plex Script Hos",pid=38533,fd=4))
LISTEN    0         128              127.0.0.1:32600            0.0.0.0:*        users:(("Plex Tuner Serv",pid=38451,fd=13))
LISTEN    0         128              127.0.0.1:36637            0.0.0.0:*        users:(("Plex Script Hos",pid=38544,fd=4))
LISTEN    0         128              127.0.0.1:42973            0.0.0.0:*        users:(("Plex Script Hos",pid=38405,fd=10))
LISTEN    0         128              127.0.0.1:38467            0.0.0.0:*        users:(("Plex Script Hos",pid=38824,fd=4))
LISTEN    0         128              127.0.0.1:40035            0.0.0.0:*        users:(("Plex Script Hos",pid=38477,fd=4))
LISTEN    0         1024                     *:32400                  *:*        users:(("Plex Media Serv",pid=38371,fd=60))
Once you are finished, you can proceed to the next step.
Enable Plex Media Server Repository
By default, Plex media server repository is disabled in the APT. So it is recommended to enable it so you can update the Plex media server using the APT command. You can enable it by editing the following file:
nano /etc/apt/sources.list.d/plexmediaserver.list
Uncomment the following line:
deb https://downloads.plex.tv/repo/deb/ public main
Save and close the file then add the Plex GPG key with the following command:
wget -q https://downloads.plex.tv/plex-keys/PlexSign.key -O - | apt-key add -
Now, update the repository with the following command to apply the changes:
apt-get update -y
Once the repository is updated, you can proceed to the next step.
Configure Nginx for Plex
Next, it is recommended to install and configure Nginx as a reverse proxy for Plex. So you can access the Plex media server using the port 80.
First, install the Nginx web server with the following command:
apt-get install nginx -y
Once the Nginx web server is installed, create a new Nginx virtual host configuration file with the following command:
nano /etc/nginx/sites-available/plex.conf
Add the following lines:
upstream plex_backend {
        server 127.0.0.1:32400;
        keepalive 32;
}

server {
        listen 80;
        server_name plex.example.com;

        send_timeout 100m; #Some players don't reopen a socket and playback stops totally instead of resuming after an extended pause (e.g. Ch$

       	#Plex has A LOT of javascript, xml and html. This helps a lot, but if it causes playback issues with devices turn it off. (Haven't enc$
        gzip on;
        gzip_vary on;
        gzip_min_length 1000;
        gzip_proxied any;
        gzip_types text/plain text/css text/xml application/xml text/javascript application/x-javascript image/svg+xml;
        gzip_disable "MSIE [1-6]\.";

       	#Nginx default client_max_body_size is 1MB, which breaks Camera Upload feature from the phones.
       	#Increasing the limit fixes the issue. Anyhow, if 4K videos are expected to be uploaded, the size might need to be increased even more
        client_max_body_size 100M;

       	#Forward real ip and host to Plex
        proxy_set_header Host $host;
        proxy_set_header X-Real-IP $remote_addr;
        proxy_set_header X-Forwarded-For $proxy_add_x_forwarded_for;
        proxy_set_header X-Forwarded-Proto $scheme;
        proxy_set_header Sec-WebSocket-Extensions $http_sec_websocket_extensions;
        proxy_set_header Sec-WebSocket-Key $http_sec_websocket_key;
        proxy_set_header Sec-WebSocket-Version $http_sec_websocket_version;
       	#Websockets
        proxy_http_version 1.1;
        proxy_set_header Upgrade $http_upgrade;
        proxy_set_header Connection "Upgrade";

       	#Buffering off send to the client as soon as the data is received from Plex.
        proxy_redirect off;
        proxy_buffering off;

        location / {
                proxy_pass http://plex_backend;
        }
}
Save and close the file then verify the Nginx for any syntax error with the following command:
nginx -t
You should get the following output:
nginx: the configuration file /etc/nginx/nginx.conf syntax is ok
nginx: configuration file /etc/nginx/nginx.conf test is successful
Next, enable the Nginx virtual host configuration file with the following command:
ln -s nano /etc/nginx/sites-available/plex.conf /etc/nginx/sites-enabled/
Finally, restart the Nginx service to apply the configuration changes:
systemctl restart nginx
You can now check the Nginx status with the following command:
systemctl status nginx
You should get the following output:
? nginx.service - A high performance web server and a reverse proxy server
     Loaded: loaded (/lib/systemd/system/nginx.service; enabled; vendor preset: enabled)
     Active: active (running) since Sat 2020-09-05 06:57:20 UTC; 1min 47s ago
       Docs: man:nginx(8)
    Process: 40059 ExecStartPre=/usr/sbin/nginx -t -q -g daemon on; master_process on; (code=exited, status=0/SUCCESS)
    Process: 40070 ExecStart=/usr/sbin/nginx -g daemon on; master_process on; (code=exited, status=0/SUCCESS)
   Main PID: 40072 (nginx)
      Tasks: 3 (limit: 2353)
     Memory: 3.6M
     CGroup: /system.slice/nginx.service
             ??40072 nginx: master process /usr/sbin/nginx -g daemon on; master_process on;
             ??40073 nginx: worker process
             ??40074 nginx: worker process

Sep 05 06:57:20 ubuntu2004 systemd[1]: Starting A high performance web server and a reverse proxy server...
Sep 05 06:57:20 ubuntu2004 systemd[1]: Started A high performance web server and a reverse proxy server.
Once you are finished, you can proceed to the next step.
Access Plex Media Server
At this point, Plex media service is installed and configure with Nginx. Now, open your web browser and access the Plex media server using the URL http://plex.example.com. You should see the following page:
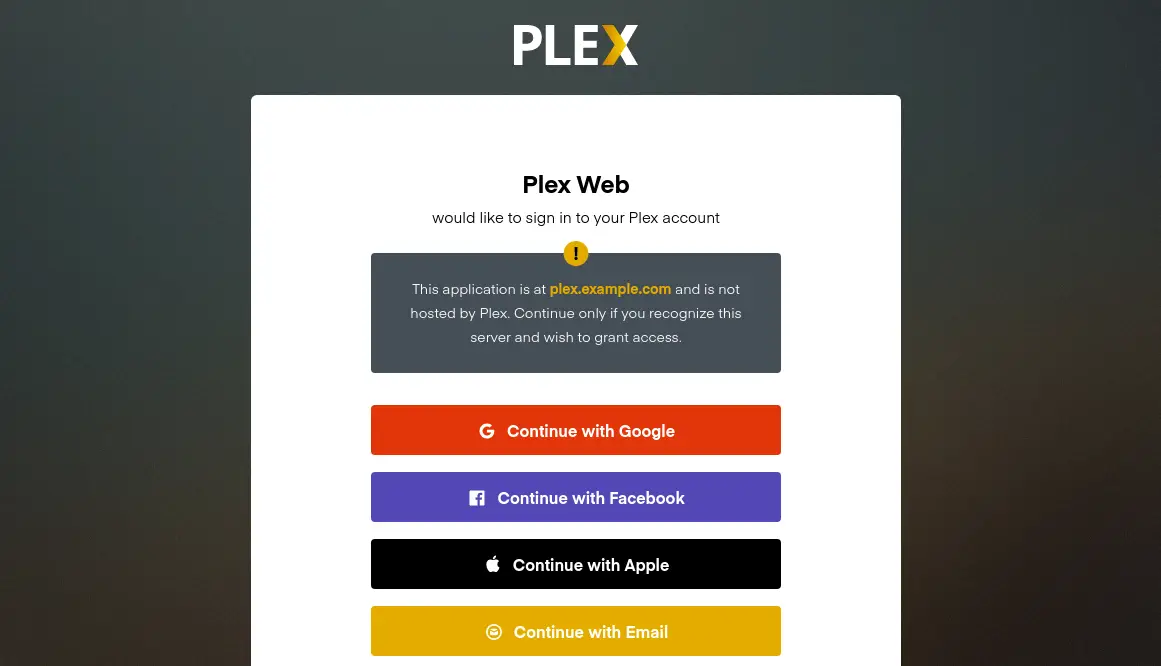
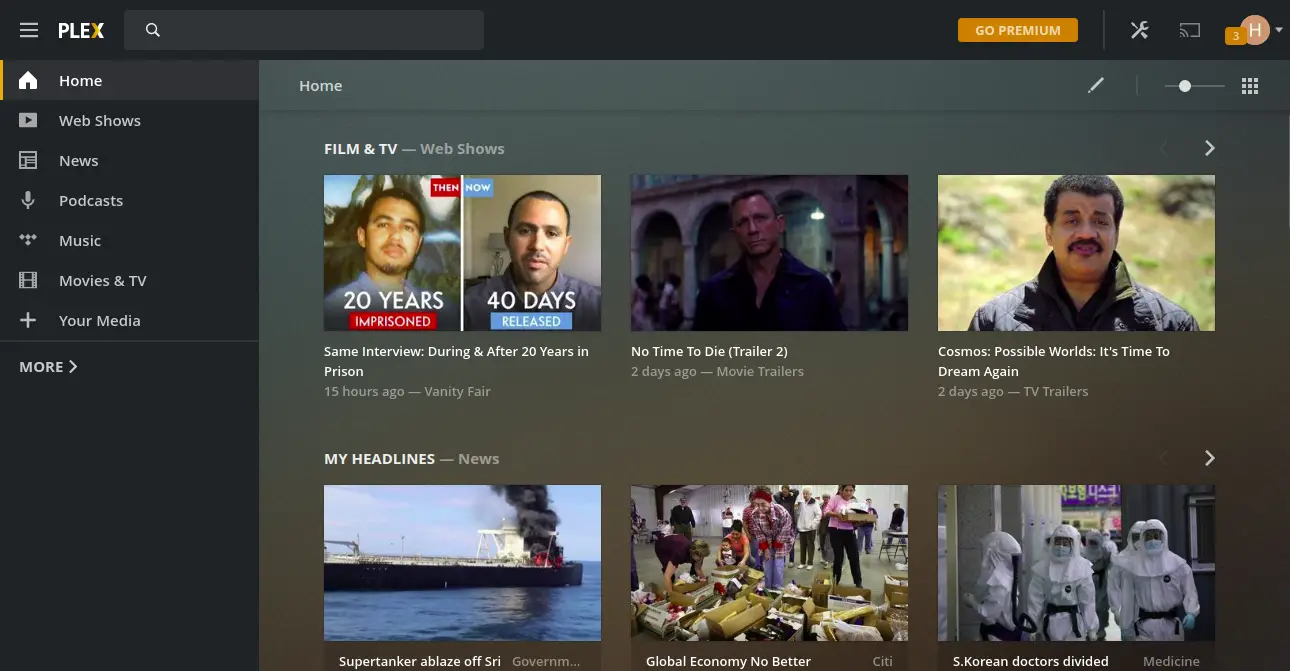
Now, log in with your Google or Facebook account. You should see the Plex media server dashboard in the following page:
Secure Plex with Let's Encrypt SSL
Next, it is recommended to secure Plex with Let's Encrypt SSL. First, you will need to install the Certbot Let's Encrypt client in your server to install and manage the SSL. You can install it with the following command:
apt-get install python3-certbot-nginx -y
After installing Certbot, run the following command to install Let's Encrypt SSL on your domain:
certbot --nginx -d plex.example.com
You will be asked provide a valid email address and accept the term of service as shown below:
Saving debug log to /var/log/letsencrypt/letsencrypt.log
Plugins selected: Authenticator nginx, Installer nginx
Enter email address (used for urgent renewal and security notices) (Enter 'c' to
cancel): [email protected]

- - - - - - - - - - - - - - - - - - - - - - - - - - - - - - - - - - - - - - - -
Please read the Terms of Service at
https://letsencrypt.org/documents/LE-SA-v1.2-November-15-2017.pdf. You must
agree in order to register with the ACME server at
https://acme-v02.api.letsencrypt.org/directory
- - - - - - - - - - - - - - - - - - - - - - - - - - - - - - - - - - - - - - - -
(A)gree/(C)ancel: A

- - - - - - - - - - - - - - - - - - - - - - - - - - - - - - - - - - - - - - - -
Would you be willing to share your email address with the Electronic Frontier
Foundation, a founding partner of the Let's Encrypt project and the non-profit
organization that develops Certbot? We'd like to send you email about our work
encrypting the web, EFF news, campaigns, and ways to support digital freedom.
- - - - - - - - - - - - - - - - - - - - - - - - - - - - - - - - - - - - - - - -
(Y)es/(N)o: Y
Obtaining a new certificate
Performing the following challenges:
http-01 challenge for plex.example.com
Waiting for verification...
Cleaning up challenges
Deploying Certificate to VirtualHost /etc/nginx/sites-enabled/plex.conf
Next, choose whether or not to redirect HTTP traffic to HTTPS as shown bellow:
- - - - - - - - - - - - - - - - - - - - - - - - - - - - - - - - - - - - - - - -
1: No redirect - Make no further changes to the webserver configuration.
2: Redirect - Make all requests redirect to secure HTTPS access. Choose this for
new sites, or if you're confident your site works on HTTPS. You can undo this
change by editing your web server's configuration.
- - - - - - - - - - - - - - - - - - - - - - - - - - - - - - - - - - - - - - - -
Select the appropriate number [1-2] then [enter] (press 'c' to cancel): 2
Type 2 and hit Enter to finish the installation. You should see the following output:
Redirecting all traffic on port 80 to ssl in /etc/nginx/sites-enabled/plex.conf

- - - - - - - - - - - - - - - - - - - - - - - - - - - - - - - - - - - - - - - -
Congratulations! You have successfully enabled https://plex.example.com

You should test your configuration at:
https://www.ssllabs.com/ssltest/analyze.html?d=plex.example.com
- - - - - - - - - - - - - - - - - - - - - - - - - - - - - - - - - - - - - - - -

IMPORTANT NOTES:
 - Congratulations! Your certificate and chain have been saved at:
   /etc/letsencrypt/live/plex.example.com/fullchain.pem
   Your key file has been saved at:
   /etc/letsencrypt/live/plex.example.com/privkey.pem
   Your cert will expire on 2020-10-30. To obtain a new or tweaked
   version of this certificate in the future, simply run certbot again
   with the "certonly" option. To non-interactively renew *all* of
   your certificates, run "certbot renew"
 - Your account credentials have been saved in your Certbot
   configuration directory at /etc/letsencrypt. You should make a
   secure backup of this folder now. This configuration directory will
   also contain certificates and private keys obtained by Certbot so
   making regular backups of this folder is ideal.
 - If you like Certbot, please consider supporting our work by:

   Donating to ISRG / Let's Encrypt:   https://letsencrypt.org/donate
   Donating to EFF:                    https://eff.org/donate-le

 - We were unable to subscribe you the EFF mailing list because your
   e-mail address appears to be invalid. You can try again later by
   visiting https://act.eff.org.
You can now access your Plex media server securely using the URL https://plex.example.com.
Conclusion
Congratulations! you have successfully installed Plex media server with Nginx as a reverse proxy on Ubuntu 20.04 server. You can now upload your media, music and photos and access them from the smartphone, TV or other streaming boxes. Feel free to ask me if you have any questions.

