
Direct internet access is not permitted in the majority of corporate networks. So, if we need to get something from the internet, we must go through some proxy servers.
Suppose we use Linux servers running Red Hat Enterprise Linux, Fedora, AlmaLinux, or RockyLinux, and we need to install new packages or apply updates. In that case, we must configure a proxy for the yum/dnf command
But before that, I want to clarify something. Perhaps some of you are confused about the two commands, yum and dnf, generally do the same thing.
Here is the answer. From Red Hat Enterprise Linux 8.0 onwards, the implementation of the yum command actually calls dnf directly since it is just a symlink to it. The same is true for the configuration files, yum.conf and dnf.conf.
And to make it even more apparent, look at the image below.
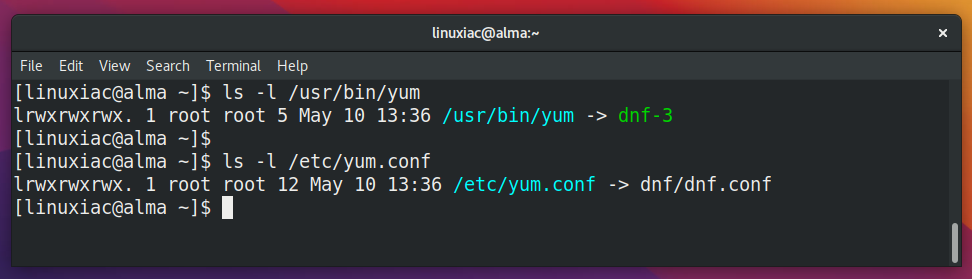
In other words, if you type yum instead of dnf, the command works as expected because yum is an alias to dnf for compatibility.
Related: How to Create an Alias and Use the Alias Command in Linux
In addition, since distros like Fedora, AlmaLinux, and Rocky Linux are Red Hat-based, the above applies to them as well.
How to Enable Proxy Settings for DNF/YUM Command
To configure the dnf/yum operations to use a proxy server, you need to modify the content of the /etc/dnf/dnf.conf file. You have three configuration options available:
proxy=http://SERVER_ADDRESS:PORT/proxy_username=USERNAME(optional)proxy_password=PASSWORD(optional)
Of course, if your proxy does not require authentication, you can use only the proxy=http://SERVER_ADDRESS:PORT/ directive.
First, open the dnf.conf file with your preferred text editor:
sudo vim /etc/dnf/dnf.confThen, add the following settings to the end of the file:
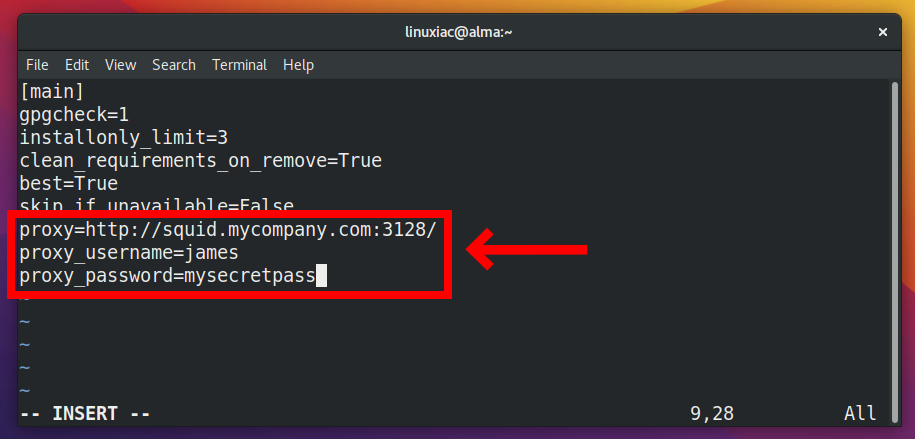
The settings above instruct the dnf command to connect to port 3128 via the proxy server squid.mycompany.com, using the login user james and the password mysecretpass.
Finally, save and close the file. That’s all! Now you will be able to update and install software using the yum/dnf command passing through a proxy server.
Please keep in mind that setting a proxy server, username, and password in the dnf.conf file means that all users who use the dnf command will connect to the proxy server with those credentials.
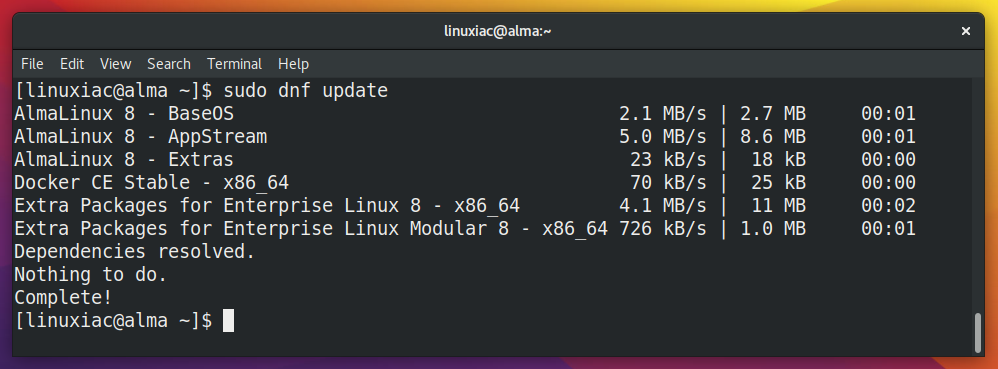
Now dnf will use the proxy settings to get updates, install packages, etc.
But sometimes, however, you may want only the root user, for example, to have proxy settings reconfigured for use with yum/dnf. Here’s how to achieve it.
Enable Proxy Access for a Specific User
So, if you do not want to configure a global proxy through the /etc/dnf/dnf.conf file, you can specify a proxy at the user level by defining it in the user’s .bash_profile file.
Fortunately, the environment variables http_proxy and https_proxy are available in Linux and UNIX-like systems. It enables the connection of text-based sessions and applications via the proxy server.
The syntax follows one of the two forms shown below:
http_proxy=http://SERVER_ADDRESS:PORT/http_proxy=http://USERNAME:PASSWORD@SERVER_ADDRESS:PORT/
If your proxy does not require authentication, you can use variant 1. Otherwise, use variant 2.
So, the steps are as follows to set the yum/dnf to use a proxy reconfigured only for the root user.
First, switch to root user, cd to its home directory, and open the .bash_profile file with your preferred text editor.
su
cd root
vim .bash_profileCode language: CSS (css)
Then, add the following two lines to the end of the file:

As a result, this proxy setting will be available to all apps, such as dnf, curl, and wget, that use the system proxy under the root login.
In other words, when an internet connection is required, these apps will connect to port 3128 via the proxy server squid.mycompany.com, using the login user james and the password mysecretpass.
Finally, source the .bash_profile file for the changes to take effect.
source ~/.bash_profileConclusion
I hope the instructions in this article to configure a proxy for the yum/dnf command in Linux were useful. So, please share your ideas and feedback in the comments section.
See the DNF Configuration Reference for a complete list of all DNF options and more information.


Is there a difference with adding the http_proxy environment lines to .bashrc? In some tutorials I find instructions to write it to .bashrc, and in the others it tells to add it to .bash_profile. Difference remains unclear to me in spite of my readings.
I mean is there an interest to load these settings everytime we open an interactive bash session rather than once at startup?
(sorry for using 2 comments for one queston but I couldn’t edit the previous one)
Hi Thomas,
In short, you asked about the differences between interactive login and interactive non-login shell. So, when Bash is run as an interactive login shell, “.bash_profile” is read and executed, whereas “.bashrc” is executed when invoked as an interactive non-login shell. In other words, yes, you can also use the “.bash_profile” file to run commands that should run only once, such as exporting environment variables, as is the case with “http_proxy” and “https_proxy.”
The additional benefit of using “.bash_profile” is that the export variable is not system-wide available but limited to the specific user whose “.bash_profile” the change was added.
Best,
Bobby
This is a simplistic answer useful in very basic architectures. If you have an internal repo server you usually won’t need a proxy for it, but if you add a repo that references the internet you will need a proxy. So, in this circumstance (not uncommon) the advice here will fail. A reasonable way to do this is to set the proxy you need for your base OS (if any) in dnf.conf as shown here. But for each repo that references an external site, add the proxy to that specific repo file: proxy=:.