Installing Simple Invoices On Debian Etch
Version 1.0
Author: Falko Timme
This tutorial describes how to install Simple Invoices on a Debian Etch server. Simple Invoices is a web-based, basic invoicing system that lets you create and manage your invoices, export them as PDF or Excel files, email them to your customers, etc. It is intended for small businesses/organizations and home users.
This document comes without warranty of any kind! I do not issue any guarantee that this will work for you!
1 Preliminary Note
In this tutorial I use the hostname server1.example.com with the IP address 192.168.0.100. These settings might differ for you, so you have to replace them where appropriate.
Simple Invoices requires an Apache-MySQL-PHP system. PHP should support GD2 (for creating PDF invoices) and XSL (for reports). In this tutorial I will install Apache, PHP, and MySQL on a fresh Debian system, and I will install Simple Invoices in the default Apache vhost in /var/www. If you have already installed Apache, PHP, and MySQL and have also configured additional Apache vhosts, you will have to adjust the settings in this tutorial to your needs.
2 Installing MySQL 5.0
First we install MySQL 5.0 like this:
apt-get install mysql-server mysql-client
Create a password for the MySQL user root (replace yourrootsqlpassword with the password you want to use):
mysqladmin -u root password yourrootsqlpassword
Then check with
netstat -tap | grep mysql
on which addresses MySQL is listening. If the output looks like this:
tcp 0 0 localhost.localdo:mysql *:* LISTEN 2713/mysqld
which means MySQL is listening on localhost.localdomain only, then you're safe with the password you set before. But if the output looks like this:
tcp 0 0 *:mysql *:* LISTEN 2713/mysqld
you should set a MySQL password for your hostname, too, because otherwise anybody can access your database and modify data:
mysqladmin -h server1.example.com -u root password yourrootsqlpassword
3 Installing Apache/PHP5/phpMyAdmin
Next we install Apache2 together with PHP5 (including GD2 and XSL support) and phpMyAdmin. phpMyAdmin is not required, but it's always good to have it in case you want a GUI for accessing your MySQL database:
apt-get install apache2 apache2-mpm-prefork libapache2-mod-php5 php5 php5-gd php5-mysql php5-xsl phpmyadmin
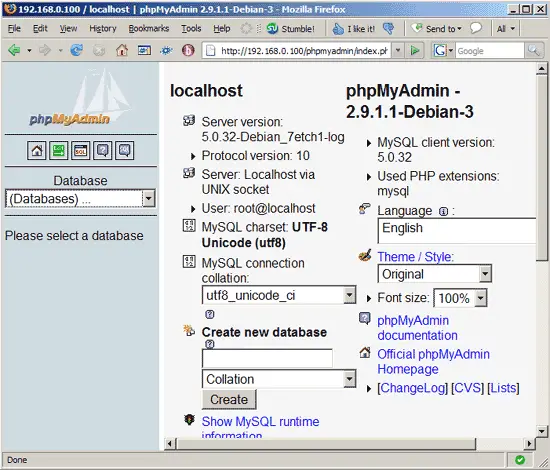
Afterwards, direct your browser to http://192.168.0.100/phpmyadmin/ to check if phpMyAdmin is working. If you see something like this, everything's fine:
4 Configuring PHP
For Simple Invoices being able to create PDF invoices, you should allocate at least 24MB of RAM to PHP. Therefore we open /etc/php5/apache2/php.ini and set memory_limit to 24M:
vi /etc/php5/apache2/php.ini
[...] ;;;;;;;;;;;;;;;;;;; ; Resource Limits ; ;;;;;;;;;;;;;;;;;;; max_execution_time = 30 ; Maximum execution time of each script, in seconds max_input_time = 60 ; Maximum amount of time each script may spend parsing request data memory_limit = 24M ; Maximum amount of memory a script may consume (16MB) [...] |
Restart Apache afterwards (restart it even if you didn't have to change php.ini - we must restart it once so that the GD2 and XSL modules installed in the previous chapter get enabled):
/etc/init.d/apache2 restart
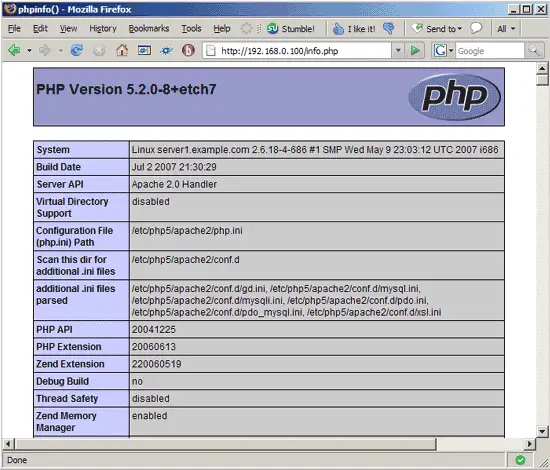
Unless you have already created virtual hosts in your Apache installation, the document root of the default web site is /var/www. We will now create a small PHP file (info.php) in that directory (if you have created virtual hosts, place it in any of the virtual hosts that has PHP enabled) and call it in a browser. The file will display lots of useful details about our PHP installation, such as the installed PHP version.
vi /var/www/info.php
<?php phpinfo(); ?> |
Now we call that file in a browser (e.g. http://192.168.0.100/info.php):
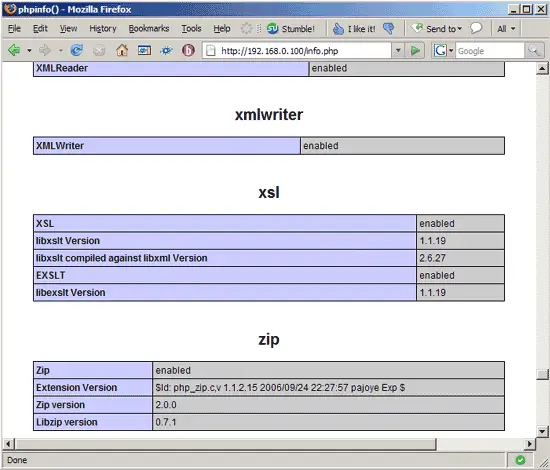
If you scroll down, you should now find the gd and xsl modules (if not, something went wrong):