3 Different Ways to Install Node.js on AlmaLinux 9
On this page
Node.js is a cross-platform java-script runtime for server-side programing language. It's built on top of Chrome's V8 JavaScript engine, which allows you to execute JavaScript code on the server side. As for developers, Node.js allows developers to create scalable backend applications using JavaScript. Also, it's one of the most popular JavaScript runtimes among full-stack and front-end developers.
Node.js has become more popular, an essential part of building server-side and networking applications, and an industry standard. It can be used to create applications for different platforms, including backend/server, desktop, web applications/front-end, and mobile applications.
This tutorial will show you how to install Node.js on AlmaLinux 9. By the end of this tutorial, you will have a better grasp of understanding on how to install Node.js with multiple methods. Moreover, you will have a ready-to-use Node.js development environment on your AlmaLinux server.
Prerequisites
To complete this tutorial, you must have the following:
- A Linux machine running AlmaLinux 9 - This example will be using the AlmaLinux server with hostname 'AlmaLinux9'.
- A non-root user with sudo/root administrator privileges.
Introduction to Node.js Installation
Node.js is an open-source JavaScript runtime for executing JavaScript applications outside the web browser. It's cross-platform JavaScript runtime built on top of Chrome's V8 JavaScript engine.
Node.js is available on most Linux distributions, including AlmaLinux. In this tutorial, we'll explore multiple methods of installing Node.js listed below:
- Installing Node.js via AppStream Repository: Theeasiest method, but limited versions of Node.js.
- Installing Node.js via Nodesource Repository:There are multiple versions available that are not available on the AppStream repository, and you must add the Nodesource repository.
- Installing Node.js with NVM (Node Version Manager):instead of system-wide, you can set up Node.js per-user settings. You can install multiple versions of Node.js and switch to different versions easily via the command line. Recommended for Node.js developers.
Now let's get started installing Node.js.
Installing Node.js via AppStream Repository
There are two versions of Node.js on the AlmaLinux 9 repository, the Node.js v16 on the default AppStream repository and v18 that can be enabled via the DNF module.
To install Node.js v16 on AlmaLinux 9, run the following dnf command.
sudo dnf install nodejs -y
But if you want to install Node.js v18, you must enable the repository module for Node.js v18 via DNF, then install it.
Run the following command to check the list repository module for 'nodejs'.
sudo dnf module list nodejs
You should see the repository 'nodejs' v18 with different types of profiles.

Run the dnf command below to enable the repository module 'nodejs' v18. Input 'y' when prompted and press ENTER.
sudo dnf module enable nodejs:18

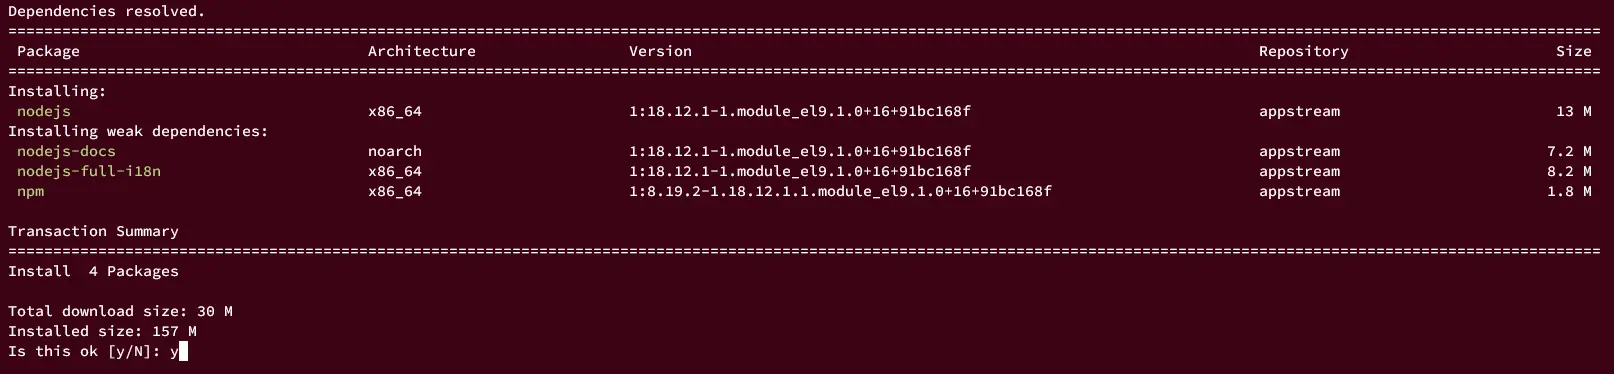
Once enabled, run the following command to install Node.js v18 via the AppStream repository.
sudo dnf install nodejs
Input y when prompted, then press ENTER.
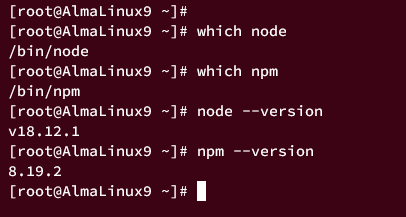
After installation is finished, verify the Node/js installation using the following command.
Check the default path of both Node.js and NPM commands.
which node
which npm
Check the Node.js and NPM version.
node --version
npm --version
You should receive an output like this:
Installing Node.js via Nodesource Repository
The second method for installing Node.js is by using the Nodesource repository, which provides Node.js binary distributions for multiple Linux distributions including RHEL-based distributions such as AlmaLinux, RockyLinux, and CentOS.
First, if you have the official Node.js repository module enabled, you must disable it using the following command.
sudo dnf module disable nodejs:18 -y
Now, install the 'Development Tools' packages using the dnf command below.
sudo dnf groupinstall 'Development Tools' -y
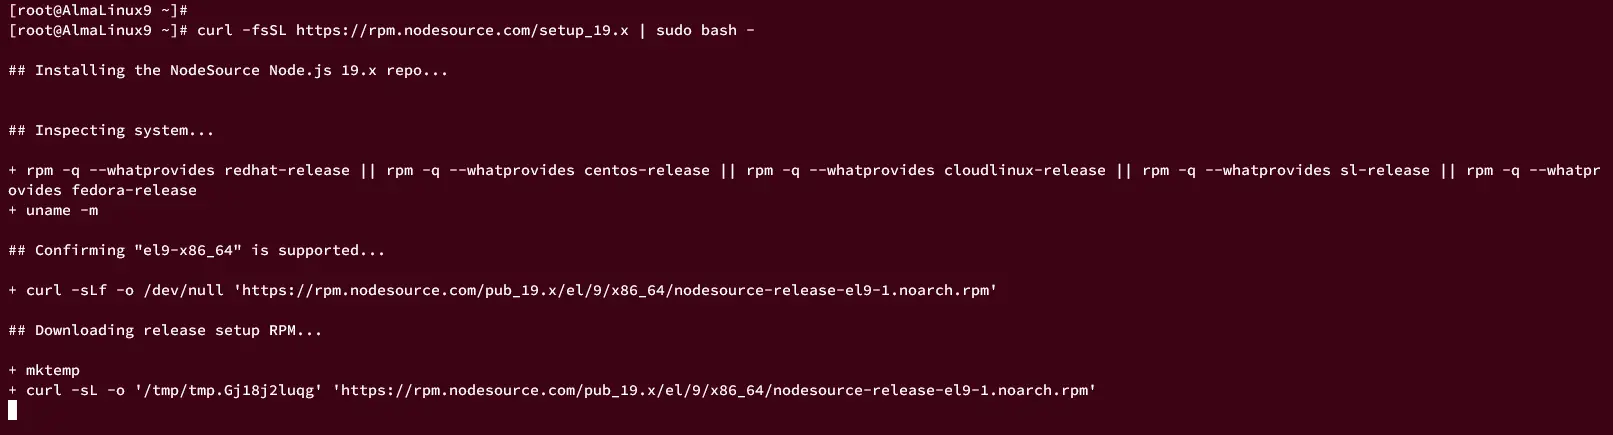
Next, choose the Node.js version that you want to install and run the following command to add the Nodesource repository for your Node.js version.
Nodesource repository for Node.js v19.
curl -fsSL https://rpm.nodesource.com/setup_19.x | sudo bash -
Nodesource repository for Node.js v18.
curl -fsSL https://rpm.nodesource.com/setup_18.x | sudo bash -
Nodesource repository for Node.js v16.
curl -fsSL https://rpm.nodesource.com/setup_16.x | sudo bash -
Nodesource repository for Node.js v14.
curl -fsSL https://rpm.nodesource.com/setup_14.x | sudo bash -
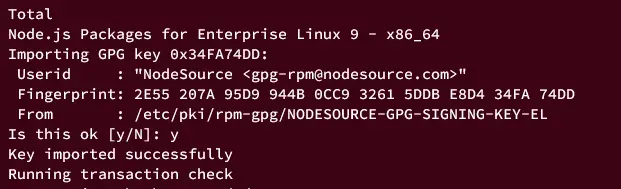
When adding the Nodesource repository, you should receive similar output like this:
Once the Nodesource repository is added, install Node.js using the following dnf command.
sudo dnf install nodejs
Input y when prompted, then press ENTER to confirm.

Additionally, you will be asked to confirm the GPG key of the Nodesource repository. Input y and press ENTER.
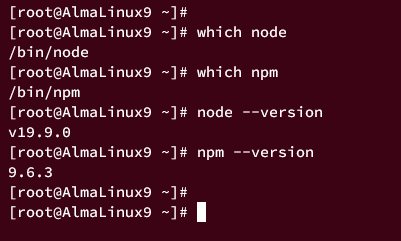
Lastly, you can now verify Node.js installation using the following command.
which node
which npm
node --version
npm --version
In this example, we've installed the latest version of Node.js v19 with NPM 9.x, and below is the similar output you should expect:
Installing Multiple Node.js via NVM (Node Version Manager)
While the two methods above are applied system-wide, this method of installing Node.js via NVM (Node Version Manager) can ab applied per user only.
With nvm, you can install multiple Node.js versions on your environment and you can easily switch to different versions via the nvm command line. This method is recommended for Node.js and JavaScript developers that work on multiple projects with different Node.js versions.
First, log in to your user using the following command. This example will be using user 'alice'.
su - alice
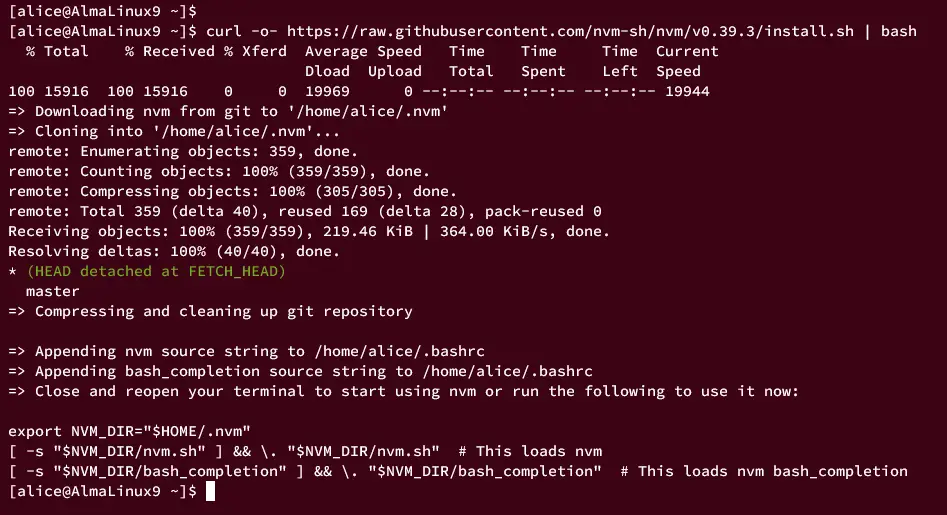
Run the following command to install NVM (Node Version Manager) on your system.
curl -o- https://raw.githubusercontent.com/nvm-sh/nvm/v0.39.3/install.sh | bash
When finished, you should expect an output like this - The nvm package will be installed in the '~/.nvm' directory and also the installer script modify your '~/.bashrc' configuration.
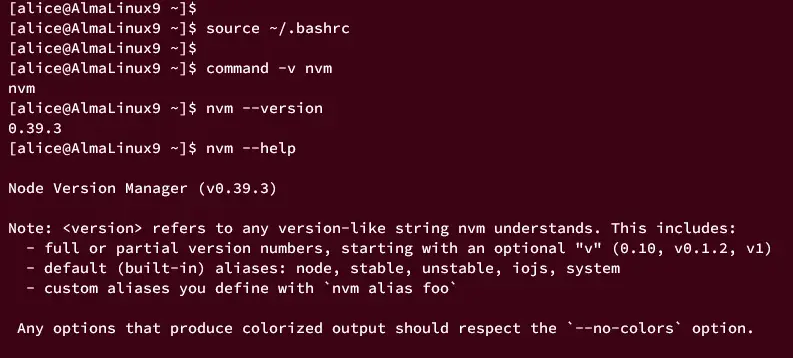
Now, run the following command to reload the '~/.bashrc' configuration and check the 'nvm' command o ensure that the installation was successful.
source ~/.bashrc
command -v nvm
If successful, you should expect an output 'nvm'.
You can now run the 'nvm' commands below to verify your installation.
nvm --version
nvm --help
You should expect an output of the current nvm version and the detailed help page of the nvm command:
Checking Available Node.js
With the NVM installed, you can now find the Node.js version that you want to install.
Run the nvm command below to get the list of available Node.js versions that you can install.
nvm ls-remote
You should see the long output of the Node.js version from 0.1 to the latest version 19.0.
v0.1.14
...SNIP...
v18.11.0
v18.12.0   (LTS: Hydrogen)
v18.12.1   (LTS: Hydrogen)
v18.13.0   (LTS: Hydrogen)
v18.14.0   (LTS: Hydrogen)
v18.14.1   (LTS: Hydrogen)
v18.14.2   (LTS: Hydrogen)
v18.15.0   (LTS: Hydrogen)
v18.16.0   (Latest LTS: Hydrogen)
v19.0.0
v19.0.1
Next, you can also filter the output to show only the LTS version of Node.js by adding the parameter '--lts' like this.
nvm ls-remote --lts
Below you should get an output of the Node.js LTS version followed by its codename. At the time of this writing, the latest LTS version of Node.js is v18.16 with the codename Hydrogen.
v4.2.0   (LTS: Argon)
v4.2.1   (LTS: Argon)
...SNIP...
v14.21.3   (Latest LTS: Fermium)
v16.13.0   (LTS: Gallium)
v16.19.1   (LTS: Gallium)
v16.20.0   (Latest LTS: Gallium)
v18.12.0   (LTS: Hydrogen)
v18.15.0   (LTS: Hydrogen)
v18.16.0   (Latest LTS: Hydrogen)
Installing Node.js via NVM
To install Node.js via NVM, you can run the 'nvm install' command below. This will install the latest version of Node.js, at this time, the latest version of Node.js is v19.
nvm install node
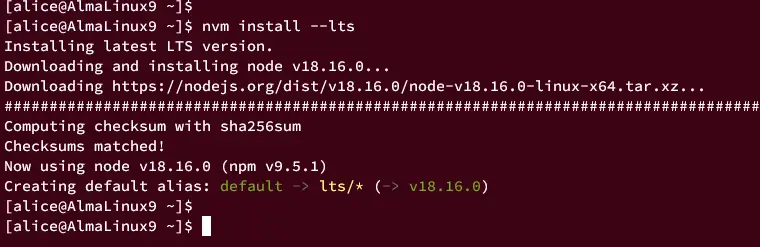
You can also use the '--lts' parameter to get the latest LTS version of Node.js. The following command will install the latest LTS Node.js v18.16.
nvm install --lts
Furthermore, you can specify the Node.js version number like this.
nvm install v19.0.0
Or using the codename like this, which will install the latest LTS version of that codename.
nvm install Gallium
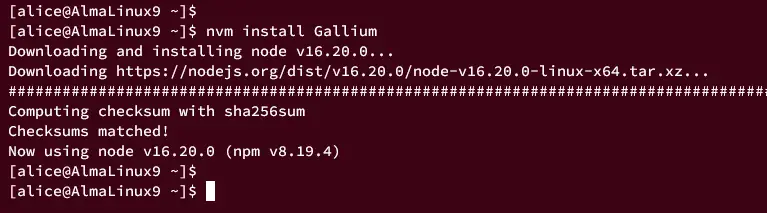
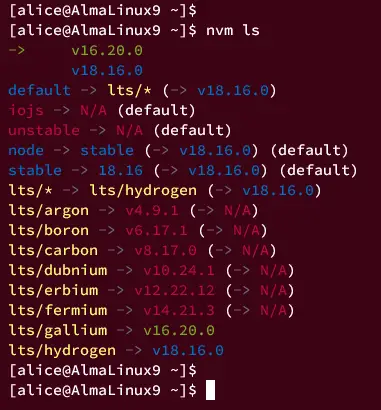
Lastly, you can run the nvm command below to check the list of installed Node.js versions on your system.
nvm ls
The version with the color blue is the installed Node.js version. The version color green is the current Node.js version that you're using, and lastly, the version color red is not installed on your system.
Switching Between Node.js Versions
As said before, using nvm you can easily switch between different versions of Node.js, which is a useful feature for Node.js developers.
Now, run the following command to check the current Node.js version that you're using.
nvm current
In this example, Node.js v16 is currently used.
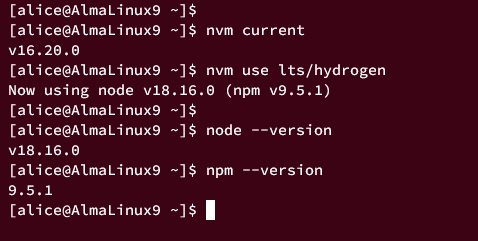
Run the following nvm command to switch from Node.js v16 to Node.js v18.
nvm use lts/hydrogen
Lastly, verify the Node.js version that is currently used using the following command.
node --version
npm --version
If successful, you should now use the Node.js v18 with the codename Hydrogen.
Conclusion
Congratulations! You have now installed Node.js on AlmaLinux 9 machine. You've learned how to install Node.js via the official AlmaLinux AppStream repository, or using a third-party repository via Nodesource, and lastly, use NMV (Node Version Manager) to install multiple Node.js versions.

